
How to Install a Gate: DIY Guide for Chain-Link, Vinyl, and Automatic Gates
Installing a gate is one of the most practical upgrades you can make to a fence. A properly installed gate improves access, defines your property boundary, adds security, and makes daily use more convenient. Whether you are enclosing a driveway, securing a backyard, or adding controlled entry to a fenced area, understanding how to install a gate the right way can save time, money, and frustration.
This DIY guide walks you through gate installation step by step. We will cover tools and preparation, chain-link fence gate installation, how to install a vinyl fence gate, and the basics of installing an automatic gate. Along the way, you will learn common mistakes to avoid and practical tips to help ensure your gate operates smoothly and securely.
How to Install a Gate: Planning Before You Start
Before digging post holes or hanging hardware, proper planning is essential. Many gate issues stem from rushed preparation rather than poor workmanship.
Start by answering a few key questions:
- What type of gate do you need, manual or automatic?
- How wide should the opening be?
- Will the gate swing inward or outward?
- Is the ground level or sloped?
- What type of fence material are you attaching the gate to?
Measure the gate opening carefully. Gate openings should be square, level, and properly spaced for the gate width plus hinge clearance. Even a small measurement error can cause sagging, dragging, or misalignment over time.
Next, check local zoning or HOA rules. Some areas have regulations on gate swing direction, driveway access, or height restrictions. Verifying this early prevents rework later.
Finally, inspect soil conditions. Gate posts carry more weight than standard fence posts. If your soil is sandy, rocky, or prone to frost movement, deeper post holes and proper concrete setting are critical.
Tools and Materials Needed for DIY Gate Installation
Having the right tools on hand makes DIY gate installation safer and more efficient.
Basic Tools
- Tape measure
- Post hole digger or auger
- Level
- String line
- Shovel
- Drill with bits
- Socket wrench set
- Rubber mallet
- Clamps
Common Materials
- Gate kit or gate panel
- Gate posts (often thicker than fence posts)
- Hinges and latch hardware
- Concrete mix
- Gravel for drainage
- Screws or bolts rated for outdoor use
For installing an automatic gate, additional components may include:
- Gate operator system
- Control board
- Power supply or conduit
- Safety sensors
- Keypad or access device
Always review manufacturer instructions before installation, especially for vinyl and automatic systems.
Chain-Link Fence Gate Installation: Step-by-Step DIY Guide
Chain-link gates are one of the most common and DIY-friendly gate types. They are widely used for backyards, side yards, and utility access points.
Step 1: Set the Gate Posts
Gate posts must be sturdier than standard line posts. Use terminal posts designed for gate applications.
- Dig post holes at least 12 inches wide and 30 to 36 inches deep.
- Add a few inches of gravel at the bottom for drainage.
- Set posts in concrete, ensuring they are perfectly plumb.
- Allow concrete to cure fully before hanging the gate.
Step 2: Assemble the Gate Frame
Most chain-link gates come as kits with adjustable frames.
- Lay the frame pieces on a flat surface.
- Assemble the rectangular frame to the correct width.
- Install diagonal bracing if included to prevent sagging.
Step 3: Attach Chain-Link Fabric
- Cut chain-link fabric to fit the gate frame.
- Attach fabric using tension bars and tie wires.
- Ensure the mesh is tight and evenly distributed.
Step 4: Hang the Gate
- Attach hinges to the gate frame.
- Hang the gate on the hinge post.
- Adjust hinges so the gate swings freely without dragging.
Step 5: Install Latch Hardware
- Position the latch at a comfortable height.
- Ensure it aligns cleanly with the latch post.
- Test opening and closing several times.
Chain-link fence gate installation is forgiving, but accuracy during post setting is what determines long-term performance.
How to Install a Vinyl Fence Gate Without Sagging
Vinyl gates are popular for residential properties because they are low maintenance and visually clean. However, improper installation often leads to sagging if posts are not reinforced.
Step 1: Reinforce Gate Posts
Vinyl gate posts usually require internal reinforcement.
- Use steel or aluminum inserts inside the vinyl post.
- Set reinforced posts in concrete.
- Confirm posts are square and level before curing.
Step 2: Assemble the Vinyl Gate Panel
- Follow manufacturer instructions exactly.
- Install internal gate frame supports if provided.
- Avoid over-tightening fasteners, which can crack vinyl.
Step 3: Mount Hinges and Gate
- Attach hinges to the reinforced post first.
- Hang the gate panel and adjust spacing.
- Ensure even gaps along the top and bottom.
Step 4: Install Latch and Stops
- Install the latch system aligned with the strike plate.
- Add gate stops if recommended by the manufacturer.
- Test gate swing and closure.
Understanding how to install a vinyl fence gate properly is critical because vinyl relies heavily on structural support rather than material rigidity.
DIY Gate Installation Tips for Manual Gates
No matter the material, these tips apply to nearly all manual gate installations.
- Always use heavier posts for gates than fence lines.
- Set posts deeper than standard fence posts.
- Allow concrete to fully cure before hanging weight.
- Install diagonal bracing to reduce sag.
- Account for seasonal ground movement.
DIY gate installation success depends less on speed and more on precision during setup.
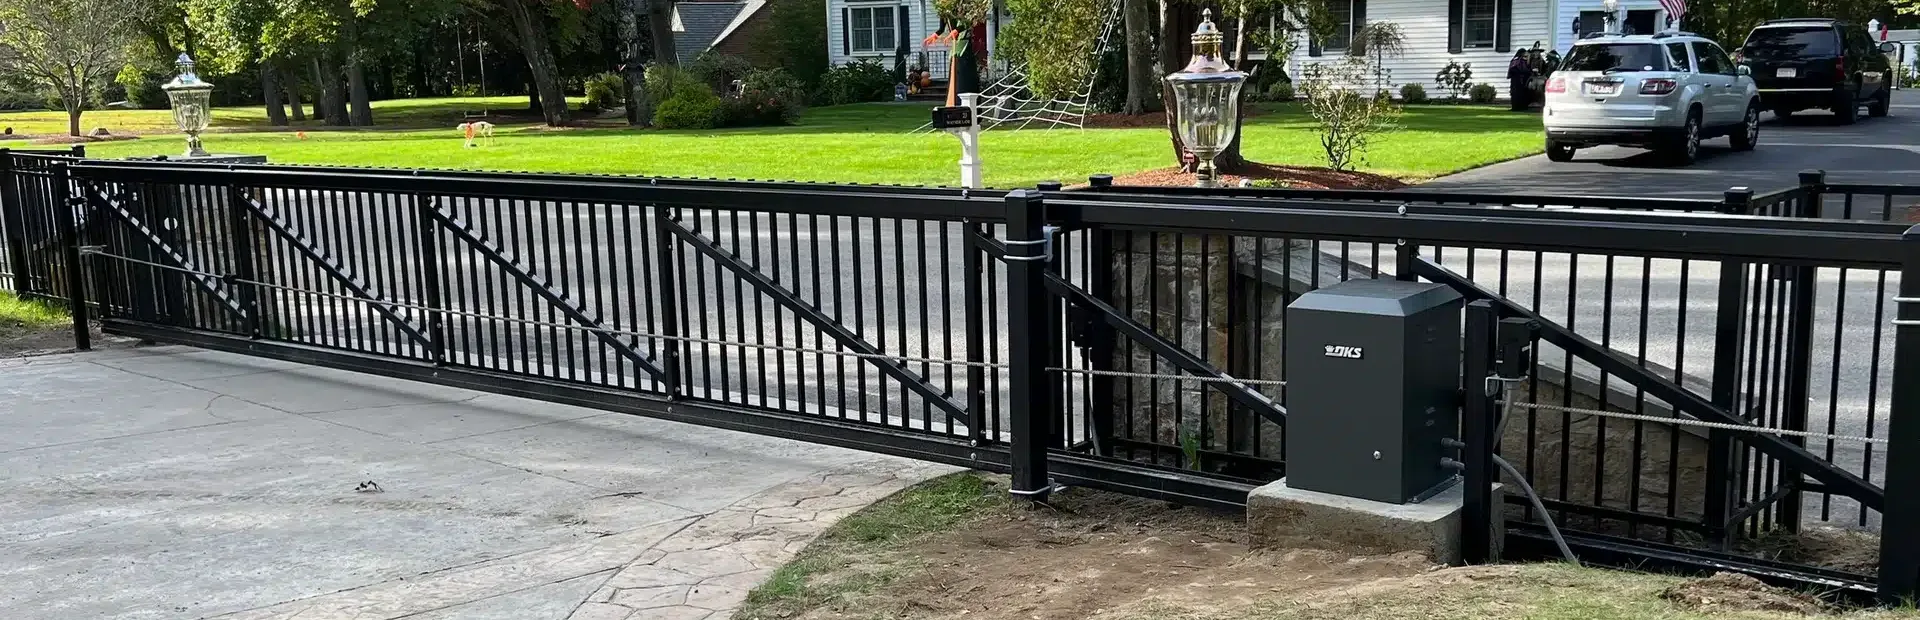
Installing an Automatic Gate: What DIYers Need to Know
Installing an automatic gate is more complex than manual gate installation. While some homeowners handle basic installs, others choose professional help for electrical and safety components.
Step 1: Choose the Right Gate Operator
Automatic gate operators vary by:
- Gate weight
- Gate length
- Swing or slide operation
- Duty cycle
Using an undersized operator leads to premature failure.
Step 2: Prepare the Gate Structure
- The gate must swing or slide smoothly before automation.
- Reinforce posts and gate frames.
- Eliminate binding, dragging, or uneven movement.
Step 3: Install the Gate Operator
- Mount the operator according to manufacturer specifications.
- Ensure correct alignment and arm geometry.
- Secure mounting brackets firmly.
Step 4: Power and Controls
- Run power safely using approved conduit.
- Install control boards, keypads, or access devices.
- Follow all electrical codes.
Step 5: Safety Devices
- Install photo eyes or obstruction sensors.
- Test auto-reverse functions.
- Confirm emergency release mechanisms work properly.
When installing an automatic gate, safety should always come first. Improper installation can create serious hazards.
Common DIY Gate Installation Mistakes to Avoid
Many gate problems come from a few repeat mistakes.
Poor Post Installation
Shallow or poorly set posts cause sagging, dragging, and misalignment.
Rushing Concrete Cure Time
Hanging a gate before concrete cures shifts posts and weakens the foundation.
Ignoring Gate Weight
Underestimating gate weight leads to hinge failure and post movement.
Skipping Reinforcement
Vinyl and wide gates require reinforcement to maintain alignment.
Improper Automation Setup
Incorrect operator placement reduces lifespan and compromises safety.
Avoiding these mistakes improves the lifespan and performance of your gate.
How to Install a Gate on Sloped Ground
Sloped installations require special consideration.
Options include:
- Raked gates that follow the slope
- Stepped installations with modified clearances
- Adjustable hinges
Measure slope carefully and choose gate hardware designed for grade changes.
Maintenance Considerations After DIY Gate Installation
Even well-installed gates benefit from periodic checks.
- Inspect hinges and fasteners annually
- Check gate alignment after winter
- Lubricate moving parts as needed
- Keep gate swing path clear of debris
Early adjustments prevent long-term damage.
When DIY Makes Sense and When It Does Not
DIY gate installation works best for:
- Standard chain-link gates
- Vinyl gates with proper reinforcement
- Manual pedestrian gates
More complex situations include:
- Wide driveway gates
- Automatic gate systems
- Commercial-grade installations
Knowing your limits helps protect your investment.
How Fence Crafter, LLC Can Help With Gate Installation
While DIY gate installation can be rewarding, some projects require advanced planning, specialized equipment, and technical experience. At Fence Crafter, LLC, we install residential and commercial gates with precision, including high-end manual and automatic systems. With decades of combined experience and a strong focus on quality workmanship, we help property owners achieve secure, reliable gate installations that operate smoothly from day one. If you are planning a gate project and want results you can rely on, our team is ready to help. For professional gate installation services, call (508) 250-8482 to get started.